
Learn the WordPress Visual Editor
NOTE: The ‘Learn the WordPress Visual Editor’ video tutorial is currently undergoing updates.What is the WordPress Visual Editor?
WordPress Visual Editor
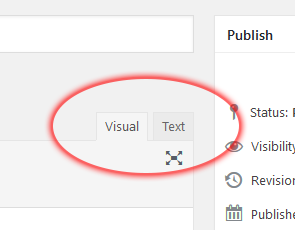
The WordPress Visual editor is a WYSIWYG (what you see is what you get) editor which displays the content in a formatted state as opposed to viewing the HTML and CSS code in raw format. To activate the Visual editor, click the Visual tab located in the upper-right corner of the editor window.
What is the difference between the Visual editor tab and the Text editor tab?
The visual editor attempts to allow users to modify the contents of a page while being able to see a certain amount of formatting. The text editor displays only raw code. While the visual editor is very useful for users, there are potential limitations which an individual with the necessary knowledge can overcome by use of the text editor.
How to Use the WordPress Visual Editor
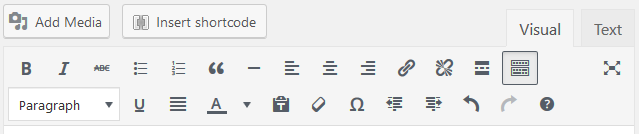
WordPress Visual Editor Buttons
The Visual Editor Options In Detail
From left to right:
Bold: Will increase the font weight of highlighted text to make it bold.
Italic: Will format the highlighted text so that it is italic.
Strikethrough: Will place a line through the highlighted text, indicating that it is incorrect or inappropriate. The proper text is usually added directly after.
Bulleted List: Begins a bulleted list using the text block in which the input cursor is located. To add another list item, position your cursor at the end of the current list item and press enter.
Numbered List: Begins a numbered list using the text block in which the input cursor is located. To add another list item, position your cursor at the end of the current list item and press enter.
Blockquote: Formats the text block in which the input cursor is currently located as a blockquote. This is typically used to display quotations.
Horizontal Line: Adds a horizontal line at the input cursor’s location. The horizontal line acts as a separator between content.
Align Left: Formats the text block in which the input cursor is currently located to be aligned to the left. Also applies to images and other media elements.
Align Center: Formats the text block in which the input cursor is currently located to be centered. Also applies to images and other media elements.
Align Right: Formats the text block in which the input cursor is currently located to be aligned to the right. Also applies to images and other media elements.
Insert / Edit Link: When clicked while text (or an image) is highlighted or selected, an input box will appear for the user to add the URL the text or image will be linked to. The highlighted text will become the link’s anchor text.
Remove Link: If a current link is highlighted, clicking the Remove Link button will remove the link.
Insert Read More Tag: Adds the WordPress More tag at the input cursors current location. The More tag is used in blog posts as they display within an index. Anything above the More tag will display on the index page. The text below the More tag will be hidden in the index view, requiring the website’s visitor to view the post directly to read more. In most cases, when the post is viewed in index view, a link or button is added at the location of the More tag indicating to the user that there is more to read.
Toolbar Toggle: Toggles the display of the second row of buttons in the visual editor.
Beginning of the second row of buttons / options:
Paragraph Drop Down: This drop down menu contains eight items: Paragraph, Heading 1, Heading 2, Heading 3, Heading 4, Heading 5, Heading 6, and Preformatted. When an option is selected while text is highlighted, the highlighted text will be formatted as the selected type.
Underline: Underlines the highlighted text.
Justify: Sets the highlighted text to be fully justified.
Text Color: Sets the font color of the highlighted text to the indicated value.
Paste As Text: Toggles the Paste As Text option on or off. When on, formatted text which is copied from a different text editor will be added to the editor without the formatting. If this option is off, the visual editor will attempt to match the formatting.
Clear Formatting: Removes all formatting from the highlighted text.
Special Character: Open the Special Character window allowing the user to select a special character which will be added to the editor at the input cursor’s current location.
Decrease Indent: Decreases the indentation for the text block in which the input cursor is currently located.
Increase Indent: Increases the indentation for the text block in which the input cursor is currently located.
Undo: Removes the previous input or command.
Redo: Re-applies a previously undone input or command.
Keyboard Shortcuts: Displays a list of keyboard shortcuts which can be used with the visual editor.